Genshin Impact: Console Graphics Rendering Pipeline
Published:
In this article, I summarize highlights from this video (Speaker: Zhenzhong Yi, miHoYo Technical Lead), along with supplementary information about the various graphic rendering techniques. This summary is my personal notes for my understanding, and is not a comprehensive source of information. I would highly recommend watching the source video linked above.
Genshin Impact for PS4 is built with Unity (using a customized engine). The graphics of the game focuses on fresh, bright, clean and anime-like visuals.
Development Practices:
Due to short development time, the decisions were made to expedite the development process to produce an MVP that matched the aesthetic goals.
- Lean Features
- Focus on key features, avoid excessive/flashy technology that do not have significant value-add
- Tried and Tested mature technologies when possible (no time to reinvent the wheel)
- Interactive Features
- Systematic transformation allows the end result to appear more unified
- Features that can affect other features have a multiplicative effect on the overall product
Lighting in Genshin Impact
Shadows
Goal:
- High quality details and far render distance (800m in Genshin Impact)
- Stable shadow, clear edges and shapes, with soft edge feathering
Methodology: Cascaded Shadow Map + Poisson Noise Soft Shadows
Cascaded Shadow Map (CSM) is a known approach that helps to fix perspective aliasing problems by providing higher resolution of the depth texture near the viewer and lower resolution far away.
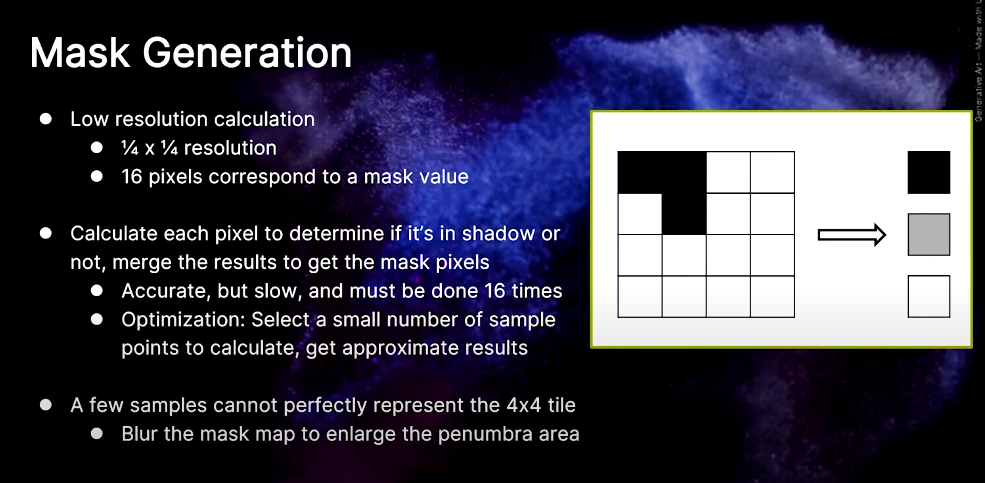
In the game, 8 cascades were used, which is a brute force method (usually 4 are used). Shadow quality increases with increasing cascades, however this also increases the performance CPU and GPU overhead. CPU optimizations were performed in order to mitigate this issue. This included Shadow Caching to reduce draw call count. The first 4 cascades are updated with each frame, along with one of the last 4 cascades (5 cascades/frame). There was no mention if the last 4 cascades are updated sequentially or randomly. This method reduces the draw call count drastically. For GPU optimizations, a screen space shadow map based on is generated. Initially, 11 samples of Poisson noise is calculated per pixel to generate soft shadows and eliminate banding. However, this is computationally expensive, resulting in GPU computation times of 2-2.6ms per pixel. Since soft shadows are only required for edge feathering, a full-screen mask map is generated to mark the shadow, nonshadow and penumbra (edge) areas. Poisson soft shadows are then calculated for only penumbra areas. This reduces the GPU computation time to 1.3-1.7ms (almost 35% improvement). The mask map gene ration algorithm is as follows:
 source: video (linked above)
Ambient Occlusion
Ambient Occlusion (AO) creates realistic shadows around objects. Screen Space Ambient Occlusion (SSAO) is one of the most commonly used AO algorithms. This early AO technology (and variants) suffer from a lack of shadow definition and quality, resulting in minimal increase in image quality as compared to the same scene without AO. 3 types of AO are used in Genshin Impact. This AO casts faint, soft shadows around objects in a scene, making characters look and feel grounded and objects look nested in the world around it.
Horizon Based Ambient Occlusion: Details in Small Areas
Unlike previous SSAO variants, HBAO uses a physically-based algorithm that approximates an integral with depth buffer sampling. In other words, the upgrade enables HBAO to generate higher-quality SSAO, whilst increasing the number of samples per pixel, increasing the definition, quality, and visibility of the AO shadowing. HBAO is usually rendered at half resolution for performance reasons, reducing the number of AO pixels by 3/4. Unfortunately, rendering HBAO at reduced resolutions inevitably causes flickering that is challenging to hide in all situations. This may be mitigated by selective temporal filtering.
AO Volume: Wide range of AO for static objects AO volume is pre-computed. Occlusion information for each object is generated in object local space. The AO value is then calculated in runtime using the local space occlusion data. AO volume generates a larger range of AO than HBAO.
Capsule AO: Wide range of AO for dynamic objects Capsule AO is computed at runtime to produce soft shadows for player characters which move dynamically. Capsule colliders wrap the arms, neck and torso of a character, and are attached to skeleton nodes of the character’s rig. This allows the shadows to be updated with character movement. 2 types of occlusion information are calculated: Long directional occlusion information and Approximated main occlusion direction (blending between main and normal directions). This results in soft shadows casted on the ground and nearby walls.
AO optimizations consist of setting a render target (with 0.5 x 0.5 resolution). Bilateral upsampling to full resolution is performed and bilateral filtered gaussian blur is applied to eliminate noise (avoid wrong pixel info from bleeding into nearby pixels). Since bilateral filter have a lot of repeated calculations, the blur and upsampling passes are merged into one compute pass to reduce the number of AO reads and writes. 4 pixels are output per thread (instead of 1) to allow reuse of intermediate calculation results. This can be performed as an async compute task to further reduce GPU computational cost.
Local Lighting
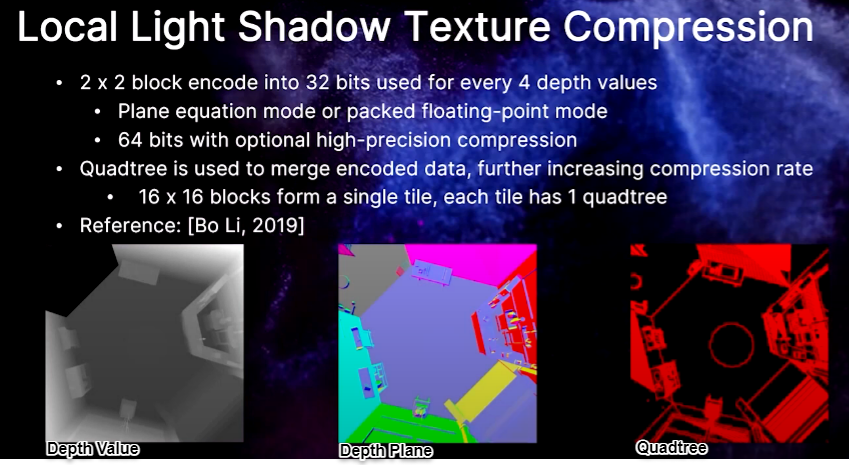
Clustered deferred lighting is implemented, which supports 1024 tiles in view. The screen is divided into 64 x 64 x 16 pixel cubes. Shadow map resolution are adjusted based on distance and render priority. The final local light shadows are computed using a combination of pre-baked static shadow textures and dynamic object shadows being cast by the object at real time. Genshin Impact has a lot of local lighting, and if simple block compression (BCn) were used to compress all the many baked shadow textures, there would be significant texture artifacting. This also puts a heavy load on both the game’s capacity and I/O. Thus a better compression algorithm is required. One that is minimal precision noise, high enough compression rate, and fast enough to be computed at runtime. The compression algorithm implemented compression shadow textures offline, then decompresses it at runtime using compute shaders. The (local light shadow texture compression)[https://history.siggraph.org/wp-content/uploads/2022/09/2019-Talks-Li_A-Scalable-Real-Time-Many-Shadowed-Light-Rendering-System.pdf] is as follows:
 source: video (linked above)
Volumetric Fog (God Rays)
Volumetric Fog is essentially an offshoot of the local lighting technique, creating dense fog in a scene which, when combined with Volumetric Lighting, can lead to deeply atmospheric visuals. This technique is used for fog, clouds, dust, smoke, or any airborne material capable of partial occlusion. In Unity, the engine computes participating media density and lighting (physically-based light scattering) at every point in the camera frustum, so that varying densities and any number of lights affecting the fog are supported. Volumetric fog is dependent on camera view. The view frustrum is divided into voxels and aligned with the clusters of clustered deferred lighting. Local light can illuminate volumetric fog, and if the local light has a projection texture, the fog will produce the corresponding effect. The fog parameters are saved in texture and loaded into the world via streaming. Parameters are injected into voxels during calculation, allowing local lighting to be taken into account during rendering. Volumetric information is obtained through ray marching, generating god rays (volumetric light scattering). God rays are generated in an additional pass using ray marching as the team decided that the god rays produced by volumetric fog alone was not satisfactory. The voxel’s resolution was not high enough and the intensity of god rays rely on the density of volumetric fog, so dense fog would result in muddy lighting. When generated separately, god rays have a higher resolution, sharper edges and more room for adjustment.
Image-based lighting
Simple pre-baked cubemaps cannot be used since the lighting in the game changes dynamically according to the game’s time of day and dynamic weather. Reflection probes are used to provide reflection data for a scene. For every probe, a mini G-buffer (geometry buffer) is saved. Cubemaps are generated from this mini G-buffer at runtime, using real-time lighting conditions. The art team can place as many reflections probes as necessary. Generation of reflection probes follows 3 steps: relight, convolve and compress. A compute shader is used to process all 6 faces of a cubemap simultaneously. Probes are updated one at a time, with calculations done over multiple frames. Async computation can be used to reduce GPU process time.
A Cubemap is a collection of six square textures that represent the reflections on an environment. The six squares form the faces of an imaginary cube that surrounds an object; each face represents the view along the directions of the world axes (up, down, left, right, forward and back).
A Reflection Probe is rather like a camera that captures a spherical view of its surroundings in all directions. The captured image is then stored as a Cubemap that can be used by objects with reflective materials.
Relight: Takes in-game current light conditions and generates a cubemap using the mini G-buffer An ambient probes are generated from ambient information in the reflection probes after relighting. This is done at runtime. The ambient probe data are saved as a 3-band SH , and the corresponding ambient probes are updated with each update on the reflection probe. Compute shaders are also used to handle all 6 faces of the ambient probes. However, relighting does not consider shadows (performance and space constraint) and the probes will leak light so the ground within a shadow may appear too bright. To mitigate this, shadows are pre-baked and saved as a shadow SH every few hours. In the same way, we save the local light’s lighting information into a local light SH.
During runtime, shadow and local light SH are interpolated according to the time of day and applied to the relight result. This reduces light leak due to lack of shadows from the reflection probe, and introduces local lighting from the ambient probe.
- Convolve: Generates the cubemap’s mipmap chain. Convolutions are applied on each mip level.
- Compress: BC6H compression is performed on the cubemap to produce 4x4 blocks (128 bits). This allows cubemaps to be more GPU-friendly.
To differentiate lighting under indoor and outdoor conditions, the reflection and ambient probes are divided into indoor and outdoor types in order to handle different indoor and outdoor lighting conditions. The art team uses the interior mesh to mark which pixels are affected by an indoor lighting environment, and the ambient probes will generate different ambient lighting for indoor and outdoor environments accordingly. With the mask, appropriate indoor lighting can be applied on sheltered areas.
Screen Space Reflection (SSR)
SSR is a technique used for applying reflections (e.g. a shiny floor). It is more commonly used for calculating subtle reflections such as on wet/shiny floor or in puddles. This technique is different that reflection technique used for rendering water. SSR is a rather expensive technique, resulting in an overhead of about 1.4ms on the PS4 Pro. SSR is also only available due to the use of deferred rendering during relighting, since it requires the use of the normal G-buffer generated during that phase. SSR is generally not recommended for use on mobile applications since it is computationally expensive. SSR reflections are able to generate reflections with greater detail that cubemaps and reflection probes. Objects using cubemaps for reflection are unable to obtain self reflection and Reflection Probe reflections are limited in their accuracy. Similar to volumetric fog, SSR is calculated through ray-marching from reflection points on the depth map to other surfaces.
A Hi-Z buffer is computed for acceleration and allows rays to trace up to the full screen. The colour buffer of the previous frame will be sampled when applying the reflections.
Colour
To support HDR display, we must consider luminance and colour space.
HDR displays uses the SMPTE ST 2084 transfer function which supports a max brightness of 10,000 nits. A wide colour gamut is also used via the Rec. 2020 colour space, which covers 75.8% of the CIE 1931 colour space, as compared to the Rec. 709 which is commonly used by HDTV and only covers 35.9%. The HDR display pipeline is as follows:
 source: video (linked above)
The HDR output is blended with the tone mapping result (SDR pipeline) in place of the ACES pipeline (RRT+ODT). This allows the game to achieve a similar result to SDR where scene intensity would not be high enough.
There are two issues arising from the rendering of HDR displays.
Consistency within SDR brightness range In SDR: EOTF_BT(PETF_sRGB(colour)) != colour in HDR: Inv_PQ(PQ(colour)) == colour An OOTF curve is added at the end of the HDR pipeline to simulate the error caused by the SDR colour conversion.
Hue Shift Many art resources rely on the hue shift generated by the tone mapping curve during SDR rendering. When rendering colours on dynamic objects, a high intensity colour map is multiplied over greyscale textures. In SDR rendering, the tone mapping curve slows down the growth speed of intensity when the R channel value is high (red/orangey colours). Initially, the delta between R and G values is high. After tonemapping is applied, the rate of increase of R channel values becomes slower than the G channel and the delta value between the channels decrease. This results in a hue shift due to the change in hue balances (i.e orange looks more yellowish). This is ideal when rendering things like fire. However, the HDR pipeline is hue preserving, so orange hues will always remain orange regardless of intensity changes.
In many games, a blackbody radiation approach is used, using temperature to calculate colour. In Genshin Impact, overhauling the game assets to accommodate the newer HDR protocol is too costly and time consuming. Instead, tone mapping curve is added onto the final colour grading, and calculations are combined using the pre-compiled colour lookup table. This simulates the hue shift phenomenon manually in the shaders when rendering in HDR.
